To remove blemishes in Photoshop, the Spot Healing Brush is the fastest route: put it on a duplicated layer, set it to Sample All Layers with Content-Aware as the source, size the brush slightly larger than the mark, and click once. Larger or stubborn spots take the Healing Brush or the Clone Stamp instead. Updated for 2026.
Photoshop still has no single “blemish” button in the main editing window, which is why the question comes up so often. The older tutorials floating around online point at Photoshop CS3 and a healing brush that behaves nothing like the one in your version today. What follows is the workflow I actually use on client portraits, with the option bar values spelled out so nothing is guesswork.
The whole job takes two to five minutes on a single face once you have the muscle memory. The slow part at the start is setting up the layer correctly, and that is the part beginners skip, which is why their retouching cannot be undone.
Table of Contents
- What You Need
- Step-by-Step: How to Remove Blemishes in Photoshop
- Common Mistakes
- Frequently Asked Questions
- What is the best Photoshop tool for removing blemishes?
- Can Photoshop remove acne and skin spots naturally?
- How do I remove a blemish without ruining skin texture?
- When should I use the Healing Brush instead of the Spot Healing Brush?
- Is frequency separation necessary for removing facial blemishes?
- How do I avoid blurry patches and halos after Photoshop healing?
- Conclusion
What You Need
Photoshop handles this job with four tools you probably already have in the toolbar. Grabbing them first means you are not hunting through menus with a portrait open and a deadline tomorrow.
- A duplicated background layer. Press Ctrl+J (Cmd+J on Mac) so every correction sits on its own layer and the original pixels stay untouched underneath.
- Spot Healing Brush Tool. Press J to cycle to it, Shift+J to cycle back through the healing family.
- Healing Brush Tool. Shares the J slot with the Spot Healing Brush, so Shift+J is how you get back and forth quickly.
- Clone Stamp Tool. Press S. This is the manual fallback when a spot will not blend automatically.
- Patch Tool. Lives behind the healing tools on the same toolbar flyout. Useful for marks with a defined edge, like a background distraction rather than a pore.
- A soft round brush on low opacity for the clean-up pass once the correction is placed.
- Zoom and view controls. You need to inspect the face at 100% and then pull back to fit on screen, because most of the mistakes only show up at one of those two magnifications.
A calibrated display is not required, but it helps. Skin colour matching is the hardest part of this work, and an uncalibrated screen hides the mismatch until the client sees the file.
Step-by-Step: How to Remove Blemishes in Photoshop
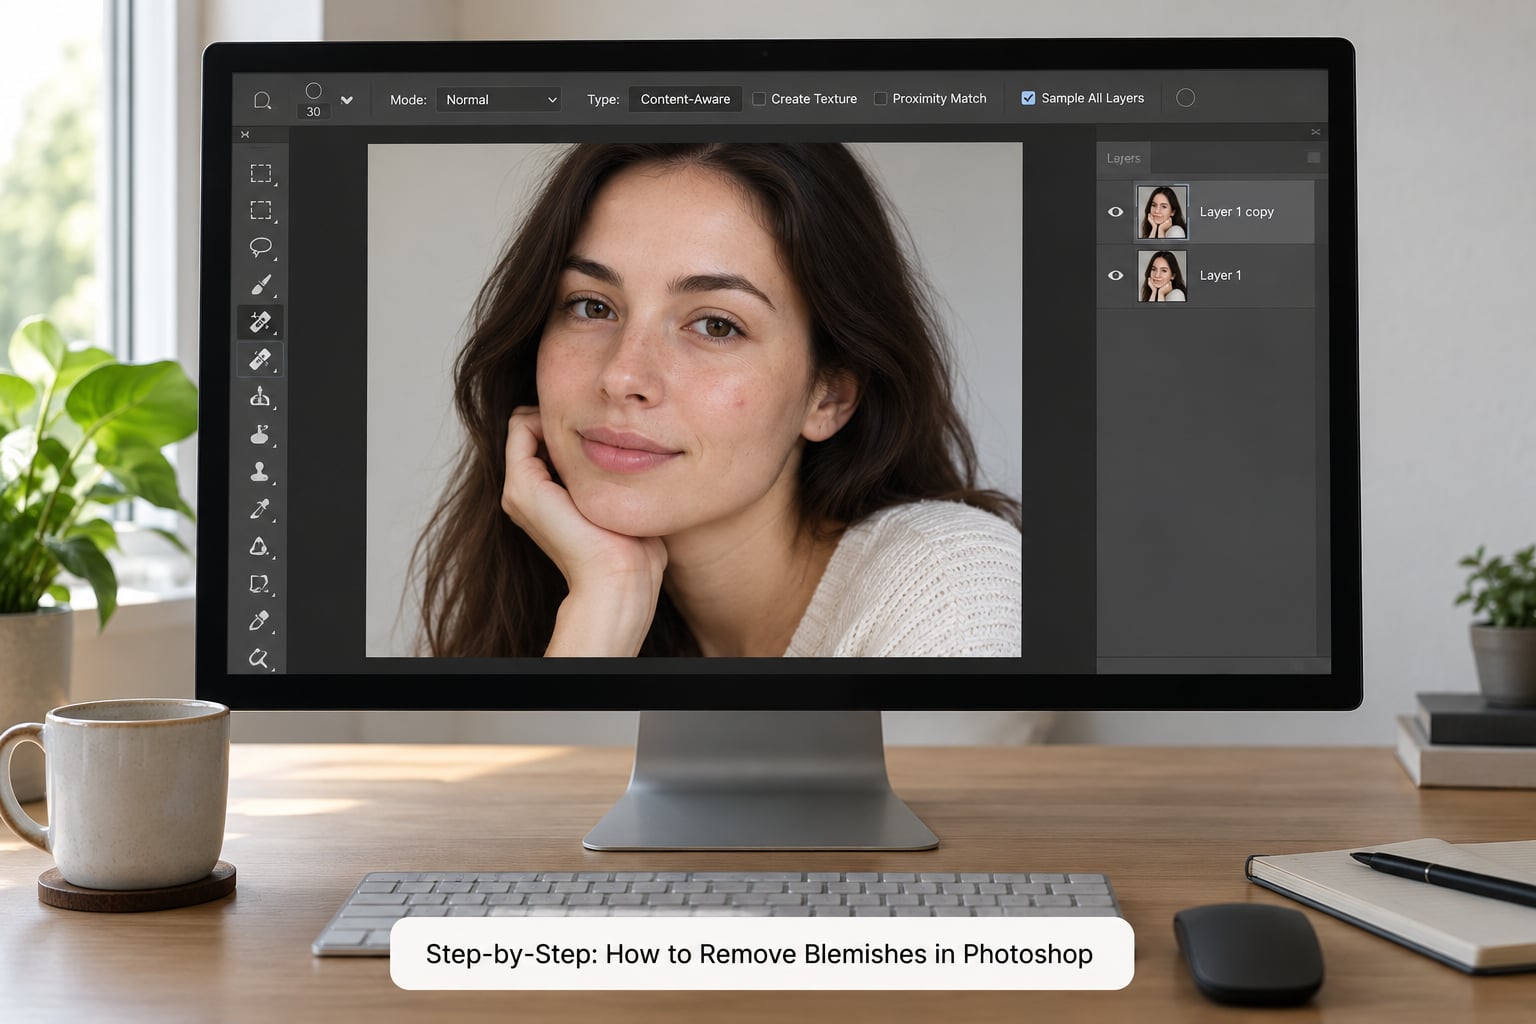
This is the full sequence, from protecting your original file to the final check at fit-on-screen size. Each step assumes the previous one is done.
1. Duplicate the Image and Set Up the Correction
How to remove blemishes in Photoshop without losing your original is decided in the first ten seconds. Duplicate the background layer with Ctrl+J (Cmd+J), rename it something like retouch, and select it.
Then press J to select the Spot Healing Brush. In the options bar across the top, check Sample All Layers so Photoshop can pull clean skin from anywhere in the stack rather than only from your new layer. Set the brush type to Content-Aware, which is the default and the one you want in almost every case.
Size the brush with the bracket keys — [ shrinks it, ] grows it. Aim for a diameter slightly larger than the blemish, so the correction edge lands on clean skin rather than on the mark itself. Hardness around 50 to 70 percent keeps the surrounding texture from turning to mush.
2. Remove Small Blemishes With Spot Healing
For a spot under about the size of a fingertip, one click with the Spot Healing Brush is usually the whole correction. Click, do not drag. Dragging turns an automatic click into a manual smear, which is why fast retouchers tap rather than paint.
After each click, zoom to 100% and check three things: does the patch match the surrounding skin tone, do the pores continue through the corrected area, and is there a faint ring around the edge where the tool blended?
How to tell it worked is simple. Turn the corrected layer’s visibility off and on with the eye icon, or nudge its opacity to 50 percent and watch the mark reappear cleanly. If the mark comes back with a hard outline around it, the brush was too small or too soft.
Hold Alt (Option on Mac) before clicking to sample a specific source area instead of letting Photoshop choose. That manual sample wins when the automatic one keeps pulling from a shadow or a reddened patch nearby.
3. Fix Remaining Marks With the Healing Brush
Use the Healing Brush when the Spot Healing Brush produces a visible ring, a colour shift, or a patch that reads as blur rather than skin. It blends the sample into the surrounding colour and texture instead of just copying pixels across.
Press Shift+J to reach it, then Alt-click (Option-click) on a clean patch of skin close to the blemish — ideally a few millimetres away, on the same plane of the face and under the same light. Set source to Sampled, brush opacity around 60 to 80 percent, and hardness near 40 percent for a soft blend.
Paint over the blemish with light strokes rather than one heavy pass. Check at 100% zoom after each stroke. The failure mode here is texture loss: if the corrected area looks smoother than the cheek beside it, drop the opacity and rebuild the area in two lighter passes instead.
Sample from the cheek or forehead rather than the nose or the area under the eye. Those zones have different colour and much finer texture, and borrowing from them is what produces a patch that reads as fake at print size.
4. Use Clone Stamp for Persistent Blemishes
Cloning is the right tool when a mark sits right on an edge — a blemish crossing the jawline, or one overlapping an eyebrow — where healing tools cannot resolve the boundary. The Clone Stamp Tool does not blend at all, it copies, so you have to place the sample precisely.
Press S, then Alt-click (Option-click) your source point on clean skin. In the options bar set Aligned to On, Flow to 40 to 60 percent, and Hardness to match the texture under the brush — lower for skin on a cheek, higher near an edge. Then click or tap once over the blemish. Repeated taps build opacity gradually and give you more control than one heavy stamp.
Never sample from a high-contrast area to cover a blemish. A mole, an eyelash, a nostril edge or a lip border all bring their contrast into the patch and produce a hard ring that no amount of healing fixes afterwards.
5. Match Skin Texture and Color After Correction
Photoshop blemish removal is finished when the corrected skin behaves like the rest of the face at 100% zoom, not when the mark disappears. A click that removes a spot but leaves a soft airbrushed patch is not finished.
Take a soft round brush at low opacity, roughly 20 to 30 percent, and lightly pass over the edges of the correction to feather any boundary you can still detect. Keep the flow low. You are blending a transition, not painting over skin.
For colour mismatch on warmer or deeper skin tones, the fix is usually a low-opacity correction layer set to a blend mode, or a Curves adjustment masked with a black brush rather than a full white layer. Painting white over the whole correction flattens the pores, which is the plastic look most people are trying to avoid.
Two zoom levels, always. Check at 100% for texture and colour, then drop to fit on screen for shape. Texture problems are invisible at fit-on-screen size, and shape problems are invisible at 100%.
6. Review the Retouched Image Before Exporting
Set the corrected layer to 50 percent opacity and toggle it. What you are checking is that natural asymmetry survives — a slightly uneven lip line, a freckle cluster, a mole, a scar. Those read as a face, and their removal is the step where retouching crosses from cleanup into alteration.
Then look at the face at 100% and at fit on screen, on the same screen you calibrated, in daylight-balanced light. Export a JPEG at quality 90 or higher for web delivery, or a 16-bit TIFF if the file is going to print.
Photographers shooting high-resolution files should repeat the check at the final output resolution, because a correction that holds at 100% on screen can still show an edge once the image is printed large. For very large files the same workflow applies; the tools do not change, only how many pixels you are inspecting.
Common Mistakes
Nearly every bad retouch I have been asked to fix came from one of these six mistakes. Each has a straight fix.
The brush is too large. A brush much bigger than the mark grabs skin from a wider area, and the blend stops matching the local colour. Bring the size down to slightly larger than the blemish.
Hardness is set too low. A very soft brush dissolves the pores around the correction, which is why the healed patch looks blurry next to detailed skin. Push hardness up for small spots on textured areas.
Cloning from the wrong place. A sample taken from a shadow, a reddened patch or a high-contrast edge carries that contrast into the correction. Sample from clean skin on the same plane of the face, under the same light.
Skin texture is erased. This happens when you retouch on a soft brush, drag the healing tool, or paint white over a correction on a soft-light layer. Undo and rebuild the correction on a fresh layer with a hard-ish brush.
Working on the only image layer. No duplicate, no second chance. Ctrl+J first, always, and keep the original beneath the correction.
Halos and colour mismatch remain. A ring around a healed spot means the sample colour and the surrounding skin disagree. Alt-click your source closer to the mark, lower the opacity, and feather the edge with a soft brush.
Every natural feature gets removed. Moles, freckles, scars and beauty marks are part of how a face looks. Removing them is not cleanup, and for client work it can be a problem rather than a favour. Ask before you touch permanent marks.
Frequently Asked Questions
What is the best Photoshop tool for removing blemishes?
The Spot Healing Brush is the best starting tool for most spots. Press J, work on a duplicated layer, leave Sample All Layers on, choose Content-Aware as the source, size the brush slightly larger than the blemish, and click once. Switch to the Healing Brush when the result rings or smears, and to the Clone Stamp when the mark crosses a defined edge such as the jawline.
Can Photoshop remove acne and skin spots naturally?
Yes, and it does it best on small, temporary marks like pimples and sore spots. The tool samples clean skin nearby and blends it over the mark, so tone and texture continue through the correction. Natural-looking results depend on two things: keeping skin texture in the corrected area, and checking the face at 100% zoom rather than only on the downscaled screen view.
How do I remove a blemish without ruining skin texture?
Use a hard-ish brush, click once instead of dragging, and match the hardness to the skin under the mark. If the healed patch looks smoother than the surrounding cheek, undo it and rebuild the correction on a fresh layer at a lower opacity. Never finish a spot by painting white over it on a soft-light layer, because that is what flattens pores and creates the plastic look.
When should I use the Healing Brush instead of the Spot Healing Brush?
Use the Healing Brush when the Spot Healing Brush leaves a visible ring, a colour shift, or a patch that reads as blur. The Healing Brush samples the surrounding colour and texture and blends into it rather than copying pixels across. Alt-click a clean area of skin a few millimetres from the mark, keep the brush soft and the opacity near 70 percent, and build the correction in light passes.
Is frequency separation necessary for removing facial blemishes?
No. Frequency separation splits tone and texture into separate layers so you can smooth colour without flattening detail, which is useful for larger tonal irregularities, but it is overkill for a spot or two. Most portraits are cleaned with the Spot Healing Brush and Healing Brush on a single duplicated layer. Reach for frequency separation only when the whole face has uneven tone that healing cannot fix.
How do I avoid blurry patches and halos after Photoshop healing?
Halos come from a sample whose colour or contrast differs from the target skin, and blurry patches come from a brush that is too large or too soft. Fix both by resizing the brush to slightly larger than the mark, raising hardness for textured skin, and Alt-clicking a source on clean skin on the same plane of the face. Check at 100% zoom, then feather the edge with a soft brush at low opacity.
Conclusion
Duplicate the layer, press J, and test the Spot Healing Brush on the smallest mark on the face. That single click tells you whether the brush settings work, and it takes less than a minute.
The standard to hold is simple. Good blemish removal in Photoshop removes the distraction and keeps the pores, the natural variation and the small asymmetries that make a face look like a face. When a correction only works after you smooth the surrounding skin, it is not finished, and the face is what gives it away.