Batch editing a portrait session means picking one representative frame from each lighting setup, getting its develop settings right, then pushing those exact settings onto every other frame shot under the same light and fixing only what genuinely varies. It is the difference between a gallery that looks like one shoot and a pile of separately graded frames.
The time saving is real. Portrait photographers in the forums regularly report finishing a 200-image engagement session in about half an hour and an 800-image wedding gallery in roughly three hours, once the shoot itself was consistent. That is how to batch edit a full portrait session without ending up with eighty near-identical frames, and those numbers only happen when the capture stage was tidy and the edit follows a fixed order.
One thing to get straight first: batching is not a filter that flattens faces, and it is not a substitute for culling. You decide which frames make the cut, split them into groups that genuinely share light, build one good edit, then push it across. Everything below follows that order.
Table of Contents
- What You Need
- How to Batch Edit a Full Portrait Session: Step by Step
- 1. Create a Working Folder and Preserve the Originals
- 2. Cull the Session in Several Passes
- 3. Group Similar Portraits for Consistent Edits
- 4. Apply Global Adjustments to the First Image
- 5. Sync Adjustments, Then Check Every Image
- 6. Add Local Adjustments Only Where Needed
- 7. Compare, Refine, and Export the Final Set
- Common Mistakes
- Frequently Asked Questions
- What is the fastest way to batch edit a full portrait session?
- Can Lightroom do batch editing?
- Is there a way to batch edit photos in Photoshop?
- Should I use presets when batch editing portraits?
- How do I keep batch-edited portraits from looking too similar?
- Is it better to edit a portrait session in Lightroom or Capture One?
What You Need
Software: any catalog-based editor with non-destructive develop settings and a sync command. Lightroom Classic, the newer Lightroom, Capture One and phone Lightroom all qualify, and I cover where they differ below.
Storage: enough free space to hold at least two copies of the session before you start, plus room for exports. Copy cards to your drive, verify the file count matches, and only then format the card. A working folder separate from your originals costs nothing and has saved me from more than one bad sync.
A naming plan: something like 2026-03-client-location. It sounds fussy, but the second you deliver three galleries in a week you will be glad you did it on the day.
Decided capture habits: a fixed Kelvin white balance instead of auto, one camera body and lens per setup block, and exposure set so you are not rescuing frames at the desk. Auto white balance introduces small shifts between frames that no amount of syncing will fix cleanly, and mixing lenses or bodies in a single group means they will respond differently to the same contrast and colour settings.
A short list of decisions made before you open the Develop module: how many images the client gets, what size you deliver, whether skin retouching is expected, and which output size the sharpening is for. Deciding those on the fly is what turns a batch into an evening.
How to Batch Edit a Full Portrait Session: Step by Step
1. Create a Working Folder and Preserve the Originals
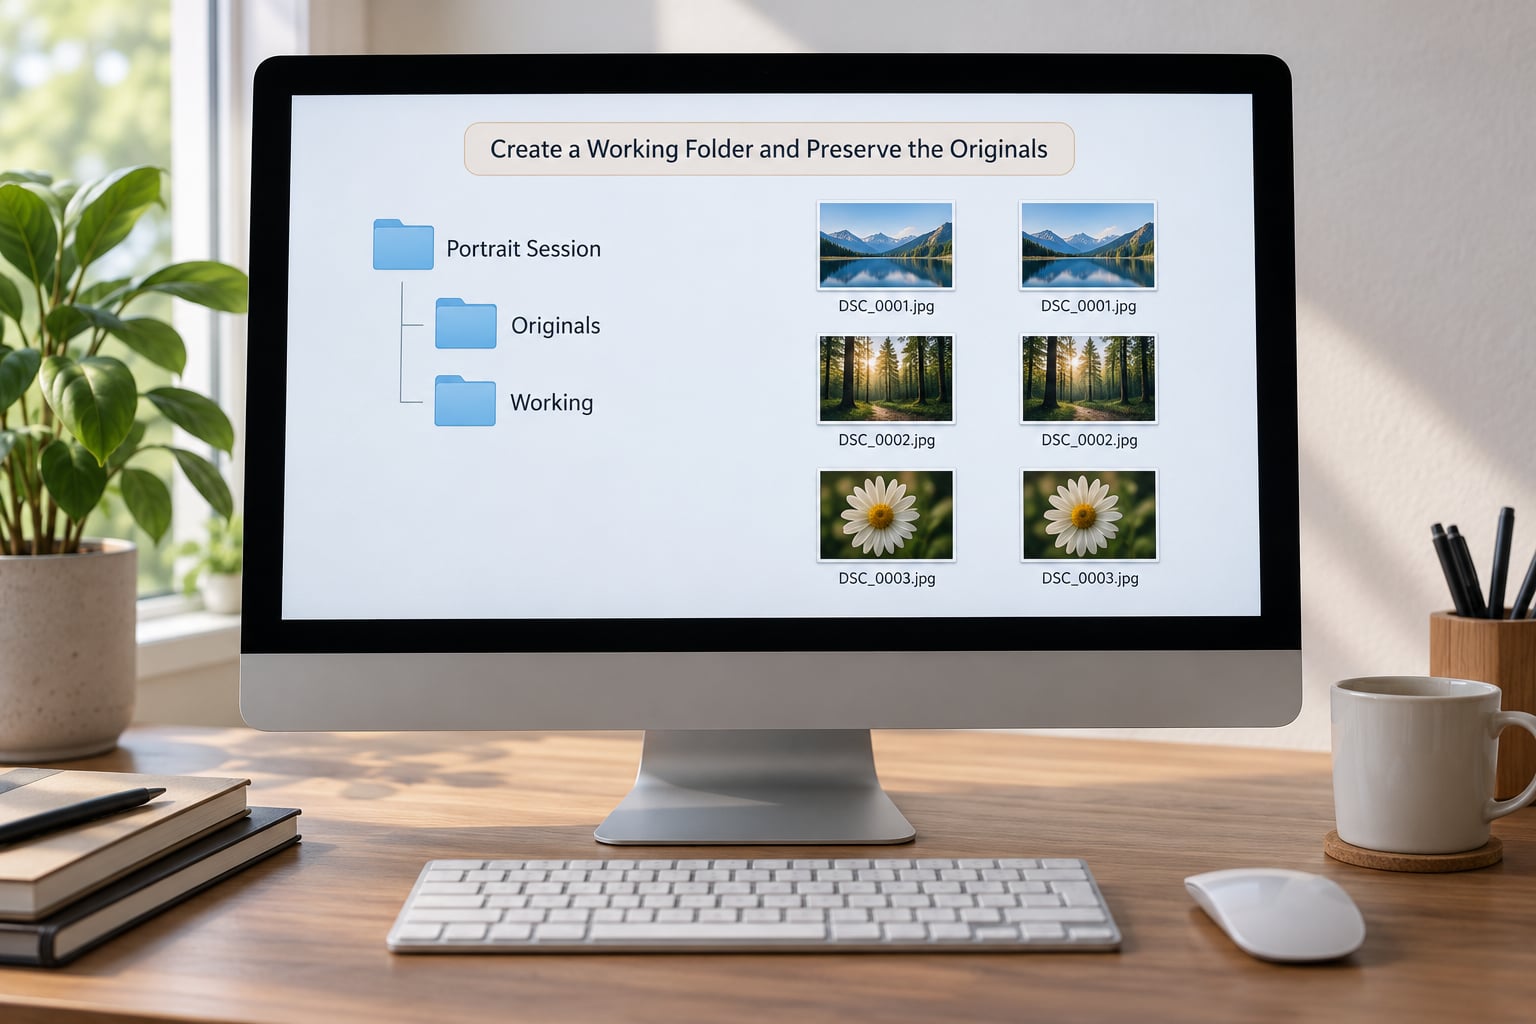
Import the session into your catalog, then copy the whole set into a dated working folder. RAW files stay untouched in practice because every editor here is non-destructive, but keeping a separate copy means a mis-pasted crop or a stray preset never touches your source data.
Name the folders before you edit, not after. Client and date first, setup inside that. When you come back to a job eighteen months later, that naming is the only thing that will still make sense.
2. Cull the Session in Several Passes
Cull first. It is the step people rush, and it is the step that decides whether batching is worth doing at all, because you never waste a sync on frames you were going to delete.
Pass one happens in Grid view at a glance. Pick out focus failures, blinkers, blown highlights and duplicate frames. You are not judging expressions yet, only sorting the obvious rejects. On a 400-frame session this takes a few minutes and can cut it in half.
Pass two is the Loupe view. Look at expression and gesture, because two technically identical frames of the same pose are worth different amounts to the client. Keep the laugh rather than the polite smile.
Pass three is about colour and background. Sun flares, a stepbrother wandering into frame, a frame shot after the subject changed shoes. Rate what survives as a 1-5 star set so you can export or review by rating later.
3. Group Similar Portraits for Consistent Edits
Now split the survivors into lighting blocks. A lighting block is a run of frames shot under the same setup: same key light in the same position, same background, same lens, same wardrobe, same general time of day.
Colour labels are the fastest way to do this. Green for open shade outdoors, blue for window light, yellow for strobe, red for anything you will treat on its own. Then keep each block in its own group.
Two things catch people. Window light shifts noticeably as the sun moves across an hour, so a long window session usually splits into two or three blocks even though nothing changed. And a session that mixes ambient daylight with strobe cannot be treated as one group at all, which is exactly why segmentation has to happen before you sync anything.
4. Apply Global Adjustments to the First Image
Choose the best-exposed, cleanest frame in the block. Not the most dramatic one. This is your hero for the group, and everything you do here gets copied outward.
Work in this order: set the profile and turn on lens profile correction, set white balance manually to the Kelvin you shot at rather than leaving it on As Shot, correct exposure, build contrast and the tone curve, add your colour grade or HLS panel work, then set texture and clarity conservatively.
Sharpening goes in last, and for the size you are delivering. Sharpening for an 85 percent screen view is far too strong for a 3000-pixel web export and far too weak for a print.
| Adjustment | In the batch pass | Per photo |
|---|---|---|
| Profile, lens correction | Yes | No |
| White balance | Yes | Check every frame |
| Exposure | Yes | Small fixes for moving subjects |
| Contrast and tone curve | Yes | No |
| Colour grading | Yes | Occasional subject-specific fix |
| Texture, clarity | Light touch only | Yes, where skin looks dull |
| Crop and straighten | Never paste across frames | Every frame |
| Spot removal, retouching | Never paste across frames | Every frame |
| Sharpening | Yes, for delivery size | No |
5. Sync Adjustments, Then Check Every Image
There are three ways to push the edit outward, and they behave differently. Paste Settings from Previous Photo is Ctrl+V on Windows and Cmd+V on Mac, and it copies everything from the image you were on, including its crop and spot removals. Copy Settings followed by Paste Settings opens a dialog where you can paste specific settings only, which is the safe option for a varied group. AutoSync is the toggle at the top of the Develop module that applies every change live to the whole selection, and it is fast enough that people leave it on by accident.
For portrait work I stick to Copy Settings and Paste Settings with a selective paste, unchecking crop and spot removal. In Lightroom Classic the selective dialog is Ctrl+Alt+Shift+V, and that one checkbox is the difference between a clean batch and a gallery of someone else’s crop decisions stamped onto your frames.
This is where most people search how to batch edit a full portrait session without wrecking it. Sync the block, then actually look at every frame. Faces are unforgiving about inconsistency, and a synced set goes wrong in a small number of predictable ways.
Exposure drifts when the subject moves between the light and the shade, so a third of a stop of correction is sometimes all a frame needs. White balance shifts under cloud or when you turn on a second light. And if a block spans two lenses or two bodies, the same contrast and colour values will not sit identically, so those frames need a small manual nudge.
6. Add Local Adjustments Only Where Needed
Everything that changes from frame to frame happens here, and it is the part that stops a batch from looking manufactured. Use masks: eye brightening and a gentle catchlight adjustment on some frames, teeth whitening on the smiling ones, stray hair and clothing cleanup, a dodge and burn pass for shaping light that fell differently because the subject shifted.
Background cleanup through a brush mask is the highest-value local work in most portrait sets, since it is what makes a delivered gallery feel finished.
Stay conservative on skin. Heavy texture and clarity sliders plus aggressive smoothing produce the plastic look that makes a synced gallery obvious. Keeping real texture reads as a photograph; wiping it out reads as a filter.
7. Compare, Refine, and Export the Final Set
Run a quality-control pass before anything leaves your machine. Back in Grid view, scan the block side by side and look for the odd one out, then fix it. Toggle before and after in the Loupe view to confirm the group actually holds together rather than only looking right one frame at a time.
Check skin tones across the set specifically, because mismatched oranges are the first thing a client notices. Then export through an export preset sized for delivery, soft proofing first if the job is going to print.
Save the export preset. Next session with the same lighting, you are back to one click instead of rebuilding the settings from memory.
Common Mistakes
Pasting settings across differently framed frames. Copy and paste in Lightroom Classic carries crop angle and spot removals with it, so every frame inherits the hero’s framing and random healing. Use Paste Settings With Options and clear crop and spot removal before you paste.
Leaving AutoSync on. One slider drag across an entire selection, and you are undoing it one image at a time. Toggle it off the moment a group is finished. It is genuinely useful for a tight block of similar frames and a liability the second you move to a different setup.
Treating one session as one group. The moment the light changes, a single synced edit produces frames that are all slightly wrong. Segment first, sync second.
Leaving white balance on As Shot. Auto white balance gives you micro-variation between frames that reads as sloppy once images sit next to each other. Set Kelvin manually and correct once per block.
Syncing sharpening at screen size. Set sharpening for the export size, or a big gallery print will show halos around hair and eyelashes.
Pushing texture and clarity hard. Those two sliders are the fastest route to crunchy skin across a whole batch. A light global value plus per-frame local work looks far better.
Culling after editing. You end up syncing settings onto frames you would have deleted, which is time spent on the cull you were trying to avoid.
Skipping the quality-control pass. A synced block usually needs two or three corrections at the end. Ten minutes of loupe review saves an awkward client email.
A few habits that pay off every time: reset a frame with Ctrl+Shift+R in Lightroom Classic when you want a clean slate, rate your cull so exports can be filtered by rating, and keep one session of several shoots open at once when you can batch similar jobs into the same block of working time.
Frequently Asked Questions
What is the fastest way to batch edit a full portrait session?
Cull first, then split the survivors into lighting blocks, build one careful base edit on the best frame in each block, and sync it with Copy Settings and Paste Settings With Options. Finish with small per-frame corrections and a loupe pass before export.
Can Lightroom do batch editing?
Yes. Lightroom Classic, the newer Lightroom, and Lightroom Mobile all support it. Classic gives you the most control, including selective paste and AutoSync. The newest Lightroom is faster for large catalogs, and Mobile can copy settings with a long press but has fewer sync controls.
Is there a way to batch edit photos in Photoshop?
Yes, through Actions. You record the steps once, open File, Automate, Batch, choose the Action and the folder, and add destination and naming rules. Actions repeat identical operations, so variable frames still need per-photo work, and none of it is non-destructive.
Should I use presets when batch editing portraits?
Presets save time, but they work best as a starting point rather than a finished treatment. Build or choose a preset that matches the lighting and skin tones of that specific block, paste it, then dial back anything that makes skin look plastic. One preset per body and lens gets you most of the way.
How do I keep batch-edited portraits from looking too similar?
Keep the global edit consistent and let local adjustments carry the differences. Small changes to expression-based exposure, skin texture, background cleanup and sharpening vary frame by frame without touching the overall grade. That variation is what makes a synced set read as real rather than filtered.
Is it better to edit a portrait session in Lightroom or Capture One?
Both handle non-destructive editing, syncing, masks and catalog-based workflows well. Choose the program you already know, since familiarity beats small feature differences at this level. Lightroom Classic is the usual pick for large catalogs, and Capture One is a comfortable alternative for tethered studio work.
Start tomorrow’s session by fixing the white balance on camera and culling before you open the Develop module. That single habit is what makes it possible to learn how to batch edit a full portrait session properly: one good base edit per lighting block, synced across, then small local corrections on the frames that need them.